#upgrade node ubuntu
Explore tagged Tumblr posts
Visit Tumblr Blog
Explore Tumblr blogs with no restrictions, modern design and the best experience.
Last Seen Tumblr Blogs


Fun Fact
Tumblr was acquired by Yahoo for $1.1B in 2013.
Text
#How to Upgrade Node JS to a Specific Version in Ubuntu#update node version in ubuntu#upgrade node js in ubuntu#node update ubuntu#upgrading node version ubuntu#upgrade node ubuntu#ubuntu update node#node ubuntu update#ubuntu update node to 18#upgrade node js ubuntu#how to update node js ubuntu#ubuntu upgrade node#upgrade node version linux#ubuntu nodejs update#ubuntu upgrade node to 16#ubuntu update nodejs version#update node version ubuntu#upgrade nodejs on ubuntu#upgrade nodejs version ubuntu#linux upgrade nodejs#ubuntu upgrade nodejs#upgrade nodejs ubuntu#upgrade node js ubuntu 20.04
0 notes
Text
How to create a single Node Kubernetes Cluster with dual stack IPv4/IPv6 Support with CRI-O and Calico
In this blog post, I have summarized how I have set up a single-node Kubernetes cluster version 1.32 on a fresh Ubuntu 24.04 with dual stack IPv4/IPv6 support. Tested with: Ubuntu 24.04 Kubeadm 1.32.3 CRI-O 1.32 Calico 3.29.3 Step 1: Update the system sudo apt-get update && sudo apt-get upgrade -y Step 2: Disable Swap sudo swapoff -a sudo sed -i '/swap/d' /etc/fstab Step 3: Install required…
0 notes
Text
Upgrade of OTA System Based on Forlinx OK3568-C Single Board Computer
OTA is a way to upgrade the system for the device without loss, and can remotely deploy new functions to the product. We can not only download the OTA upgrade package through the network, but also upgrade the device by downloading the OTA upgrade package to the SD card or U disk.
In this article, we will introduce the OTA upgrade process, the process of local upgrade program recovery, and the technical details of the upgrade through the Forlinx Embedded OK3568-C development board.
1. Making recovery.img
Recovery The associated source code path:
buildroot/output/OK3568-recovery/build/recovery-develop
If any of the source files in the above directory have been modified, you need to perform the following actions:
(1). forlinx@ubuntu:~/OK3568-linux-source$ source envsetup.sh
(2). Select the recovery configuration for a platform and enter 96
(3). forlinx@ubuntu:~/OK3568-linux-source$ make recovery-dirclean && make recovery #Clear the compilation product and recompile
(4). forlinx@ubuntu:~/OK3568-linux-source$ make rkupdate-dirclean && make rkupdate #Clear the compilation product and recompile
If you have not modified the source code files in the above directory, then do the following directly:
(1). forlinx@ubuntu:~/OK3568-linux-source$ ./build.sh recovery #compile to generate recovery.img
(2). forlinx@ubuntu:~/OK3568-linux-source$ ./mkfirmware.sh
# Copy the generated firmware to the rockdev/ directory
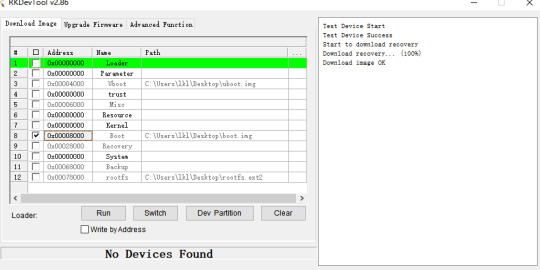
Flash/OK3568-linux-source/buildroot/output/OK3568-recovery/images/recovery.img file.
Click Device Partition Table, tick 9, select recovery path, and click Execute.
2. Make an upgrade image
How to verify that the upgrade was successful? We need to have a preliminary understanding of the boot.img file holds the device tree and kernel, and we just need to make appropriate changes to the device tree or kernel. This routine updates the boot.img file as an example, with appropriate changes to the device tree.
Modify the device tree:
/OK3568-linux-source/kernel/arch/arm64/boot/dts/rockchip/OK3568-C-common.dtsi,Modify the forlinx _ control node as follows. By default, only the HDMI output is turned on, leaving the MIPI and LVDS outputs off.

Modify the file:
/OK3568-linux-source/tools/linux/Linux_Pack_Firmware/rockdev/package-file
Modify this file as required, this routine updates boot.img as an example, so comment out the other .img files. Users can adjust this file to meet product update requirements.
This routine takes the example of modifying the device tree display and recompiling the kernel after modifying the device tree.
forlinx@ubuntu:~ /OK3568-linux-source$ ./build.sh kernel #modify the device tree, then regenerate the kernel
forlinx@ubuntu:~/OK3568-linux-source$ ./build.sh updateimg #package Upgrade Package Firmware
Use /Ok3568--linux-source/rockdev/update.img file to upgrade.
3. Upgrade operation
SD card or USB flash drive upgrade
Mount the SD card or USB disk to the /run/media directory of the OK3568-C development board by default. Copy the update.img image file to the /userdata directory of the OK3568-C development board, and the system will detect the upgrade package in this directory and upgrade it automatically after rebooting the board.
FTP server upgrade
Execute the following command on the OK3568-C development board to copy the upgrade package file from the server to the development board for upgrading.
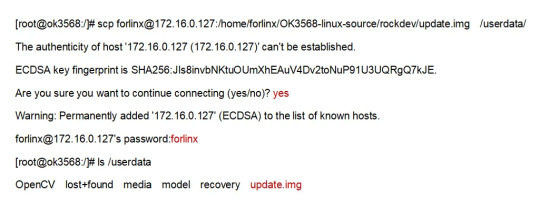
After the download is complete use the following command to upgrade:
update ota /userdata/update.img
During the upgrade process, the device will enter recovery mode and upgrade automatically, after the upgrade is successful, it will enter the normal normal system.
4. Verify the test results
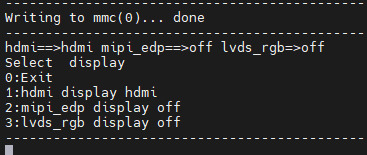
Power up the OK3568-C development board and the serial terminal will enter the uboot screen selection interface by holding down the space bar. The phenomenon of flashing default factory image files: by default, HDMI, MIPI, and LVDS three outputs are enabled.

Phenomenon after flashing upgrade package image file: Only HDMI display is enabled, and the other two outputs are closed.
5. Safety instructions
When creating the update.img firmware, remember you can choose to include all partitions or just specific ones. Modify the package-file to remove unnecessary partitions, reducing the update.img size.
If ''recovery.img'' is included in the ''package-file,'' it won't be upgraded in Recovery mode. To prevent issues where power loss during recovery.img upgrading could disrupt the upgrade of other partitions, it's recommended to upgrade this partition under normal system mode. When executing the update command, the system will first check if ''recovery.img'' is included in the update.img package. If so, it will upgrade the recovery partition before entering Recovery mode to upgrade other partition firmware.
It's not recommended to include the ''misc'' partition in the update.img. Even if it's included, the upgrade program will ignore it when detected. Even if the ''misc'' partition is upgraded, the recovery program will still clear all commands and parameters in the ''misc'' partition after a successful upgrade, which may not yield the expected results.
If the update.img package is placed in the ''userdata'' partition in flash memory, ensure that ''userdata.img'' is not included in the package-file. This is because it may lead to file system damage, potentially causing the OEM or user data partition to fail to mount successfully after the upgrade. If upgrading from an SD card or USB disk, you can pack user data. img to upgrade the user data partition. After the upgrade is completed, the user data partition will be re-sized.
With that, the entire process of OTA upgrades has been explained. Users can follow the instructions in this article for experimentation. Once they are familiar with the operations described in this article, they can modify U-Boot, the kernel, or the file system to remotely upgrade their products via OTA. This enables them to fix bugs in their products, making it more convenient to optimize and iterate on their products.
Originally published at www.forlinx.net.
0 notes
Text
Mastering Hadoop Installation on Ubuntu Server: A Step-by-Step Guide
Are you ready to dive into big data processing with Hadoop on Ubuntu Server? Look no further! In this comprehensive guide, we’ll walk you through the installation process step-by-step, ensuring you have everything you need to get started. Whether you’re a Linux aficionado or a Windows RDP��enthusiast looking to buy RDP and install Ubuntu on RDP, this guide has you covered.
Understanding Ubuntu Server: Before we delve into the installation process, let’s take a moment to understand Ubuntu Server. Ubuntu is one of the most popular Linux distributions, known for its stability, security, and ease of use. Ubuntu Server is specifically designed for server environments, making it an ideal choice for hosting Hadoop clusters.

2. Setting Up Your Environment: If you’re using Ubuntu Server on a physical machine or a virtual environment like VMware or VirtualBox, ensure that it meets the minimum system requirements for running Hadoop. This includes having sufficient RAM, disk space, and processing power. Alternatively, if you’re considering using Windows RDP, you can buy RDP and install Ubuntu on it, providing a flexible and scalable environment for Hadoop deployment.
3. Installing Ubuntu Server: Begin by downloading the latest version of Ubuntu Server from the official website. Once downloaded, follow the on-screen instructions to create a bootable USB drive or DVD. Boot your system from the installation media and follow the prompts to install Ubuntu Server. Make sure to allocate disk space for the operating system and any additional storage required for Hadoop data.
4. Configuring Network Settings: After installing Ubuntu Server, configure the network settings to ensure connectivity within your environment. This includes assigning a static IP address, configuring DNS servers, and setting up network interfaces. Proper network configuration is essential for communication between Hadoop nodes in a distributed environment.
5. Updating System Packages: Before installing Hadoop, it’s essential to update the system packages to ensure you have the latest security patches and software updates. Use the following commands to update the package repository and upgrade installed packages:bashCopy codesudo apt update sudo apt upgrade
6. Installing Java Development Kit (JDK): Hadoop is built on Java, so you must install the Java Development Kit (JDK) to run Hadoop applications. Ubuntu repositories provide OpenJDK, an open-source implementation of the Java Platform. Install OpenJDK using the following command:bashCopy codesudo apt install openjdk-11-jdk
7. Downloading and Installing Hadoop: Next, download the latest stable release of Hadoop from the official Apache Hadoop website. Once downloaded, extract the Hadoop archive to a directory of your choice. For example, you can use the following commands to download and extract Hadoop:bashCopy codewget https://www.apache.org/dist/hadoop/common/hadoop-3.3.1/hadoop-3.3.1.tar.gz tar -xvf hadoop-3.3.1.tar.gz
8. Configuring Hadoop Environment: After installing Hadoop, you’ll need to configure its environment variables to specify the Java runtime environment and other settings. Edit the hadoop-env.sh file located in the etc/hadoop directory and set the JAVA_HOME variable to the path of your JDK installation:bashCopy codeexport JAVA_HOME=/usr/lib/jvm/java-11-openjdk-amd64
9. Setting Up Hadoop Cluster: Once Hadoop is installed and configured on your Ubuntu Server, you can proceed to set up a Hadoop cluster. This involves configuring Hadoop’s core-site.xml, hdfs-site.xml, and mapred-site.xml configuration files and starting the Hadoop daemons on each node in the cluster.
10. Testing Hadoop Installation: To ensure that Hadoop is installed and configured correctly, you can run some basic tests. Start by formatting the Hadoop Distributed File System (HDFS) using the following command:bashCopy codehdfs namenode -format
Then, start the Hadoop daemons and verify their status using the following commands:bashCopy codestart-dfs.sh start-yarn.sh
Finally, run a sample MapReduce job to confirm that Hadoop is functioning correctly:bashCopy codehadoop jar $HADOOP_HOME/share/hadoop/mapreduce/hadoop-mapreduce-examples-3.3.1.jar pi 16 10000
Congratulations! You’ve successfully installed Hadoop on the Ubuntu Server, ready to tackle big data processing tasks with ease.
In conclusion, setting up Hadoop on the Ubuntu Server is a straightforward process that anyone can accomplish with the right guidance. Whether you’re a Linux enthusiast or prefer the flexibility of Windows RDP, you can buy RDP and install Ubuntu on it to create a robust Hadoop environment. With Hadoop up and running, you’re well-equipped to handle the challenges of big data processing and analysis.
0 notes
Text
Navigating the Tech Landscape: How to Choose the Right Hardware for Your SUI Validator Node
In the fast-evolving world of blockchain technology, SUI Validator Nodes play a pivotal role in maintaining network security and integrity. These nodes act as validators in the SUI blockchain, ensuring that transactions are valid and secure. As a prospective SUI Validator Node operator, one of the crucial decisions you'll face is choosing the right hardware to optimize the performance and reliability of your node. In this guide, we'll explore the key considerations to help you make an informed decision and set up a robust SUI Validator Node.
Understanding the Requirements of SUI Validator Nodes
Before delving into hardware specifics, it's essential to grasp the basic requirements of SUI Validator Nodes. These nodes are responsible for validating transactions and reaching consensus within the network. To do this effectively, they must meet certain technical specifications. These include sufficient processing power, memory, storage capacity, and a stable internet connection.
Processing Power: CPU Considerations
The heart of your SUI Validator Node lies in its central processing unit (CPU). The CPU is responsible for executing instructions and processing data, making it a critical component. Aim for a high-performance multi-core processor to handle the computational demands of validating transactions. Popular choices include Intel Core i7 or AMD Ryzen processors, providing the necessary horsepower to keep your node running smoothly.
Memory: RAM Matters
Random Access Memory (RAM) is another crucial factor influencing the performance of your SUI Validator Node. A higher RAM capacity allows your node to store and quickly access data, enhancing overall efficiency. Consider a minimum of 16GB of RAM for optimal performance, with the option to scale up if your node experiences increased demand.
Storage Capacity: SSD vs. HDD
Storage plays a vital role in maintaining the blockchain's ledger and transaction history. While Hard Disk Drives (HDDs) are cost-effective, Solid State Drives (SSDs) offer faster read and write speeds, significantly improving the responsiveness of your SUI Validator Node. Opt for an SSD with sufficient storage capacity to accommodate the growing size of the blockchain.
Network Connectivity: Ensuring Reliability
A stable internet connection is paramount for the continuous operation of your SUI Validator Node. Choose a reliable broadband connection with sufficient bandwidth to handle the data flow associated with validating transactions. Consider a backup connection or failover mechanism to mitigate the impact of potential outages.
Choosing the Right Operating System
Selecting the right operating system is crucial for the stability and security of your SUI Validator Node. Linux distributions such as Ubuntu or CentOS are popular choices due to their stability, security features, and widespread community support. Ensure that your chosen operating system is compatible with the SUI blockchain software.
Scalability: Planning for Growth
As the SUI network evolves, scalability becomes a key consideration. Choose hardware that allows for easy scalability, enabling you to upgrade components such as CPU, RAM, or storage as the demands on your SUI Validator Node increase over time. This future-proofing approach ensures that your node remains competitive and efficient in the long run.
Energy Efficiency: Sustainable Operation
Considering the environmental impact of cryptocurrency mining and validation, opting for energy-efficient hardware is a responsible choice. Look for components with high performance per watt ratios to reduce your node's carbon footprint and operational costs.
Regular Maintenance and Monitoring
Finally, once your SUI Validator Node is up and running, it's crucial to implement a regular maintenance and monitoring routine. Regularly check hardware health, update software, and stay informed about the latest developments in SUI Validator Nodes to adapt your hardware setup accordingly.
Conclusion
In conclusion, choosing the right hardware for your SUI Validator Node involves a careful balance of processing power, memory, storage, and network connectivity. By understanding the specific requirements of SUI Validator Nodes and keeping scalability and energy efficiency in mind, you can build a robust and reliable node that contributes to the security and decentralization of the SUI blockchain. Whether you're a seasoned node operator or a newcomer to the world of blockchain validation, investing time in selecting the right hardware is a crucial step toward a successful and sustainable operation of your SUI Validator Node.
1 note
·
View note
Text
Installing Hadoop on Ubuntu

Certainly! Let’s present the Hadoop installation process on Ubuntu uniquely and engagingly, suitable for an informative yet reader-friendly course email.
Subject: 🚀 Embark on Your Big Data Journey: Install Hadoop on Ubuntu Easily!
👋 Hello Data Enthusiasts!
Are you ready to dive into the world of Big Data with Hadoop? Here’s a straightforward guide to getting Hadoop up and running on your Ubuntu system. Perfect for beginners and experts alike!
🔧 Getting Started: Prep Your System
Freshen Up Ubuntu: sudo apt update && sudo apt upgrade
Java Installation: sudo apt install default-JDK
Java Check: Ensure it’s installed with the Java -version
👤 Create a Dedicated Hadoop User
A simple command: sudo adduser hadoop
🔑 SSH Setup: Key to Connectivity
Install SSH: sudo apt install ssh
For Hadoop User:
Switch user: su — Hadoop
Generate SSH Key: ssh-keygen -t rsa -P “
Authorize Key: cat ~/.ssh/id_rsa.pub >> ~/.ssh/authorized_keys
📥 Download Hadoop: Grab the Latest Version
Use wget with the link from the official Hadoop website.
📦 Unpack Hadoop
Unzip it: tar -xzf Hadoop-3.x.x.tar.gz
🌐 Environment Setup: Pointing in the Right Direction
Edit .bashrc: nano ~/.bashrc
Add Hadoop paths (adjust with your Hadoop version):
bashCopy code
export HADOOP_HOME=/home/Hadoop/Hadoop-3.x.x export PATH=$PATH:$HADOOP_HOME/bin:$HADOOP_HOME/sbin
Activate changes: source ~/.bashrc
⚙️ Hadoop Configuration: The Blueprint
Edit key files in $HADOOP_HOME/etc/hadoop/:
core-site.xml, hdfs-site.xml, mapred-site.xml, yarn-site.xml
🎬 Initialize and Launch
Format Hadoop FileSystem: hdfs name node -format
Start the engines: start-dfs. Sh and start-yarn. sh
👀 See Hadoop in Action!
Access Hadoop’s ResourceManager and NameNode via your browser.
🛠️ Tips & Tricks
Check firewall settings.
Log files in $HADOOP_HOME/logs/ are your best friends for any hiccups.
🚀 Your Big Data Adventure Awaits!
With these steps, you’re all set to explore the vast universe of Big Data with Hadoop on your Ubuntu machine.
Happy Data Crunching!
Your [Your Course/Team Name]
Note: Ensure the technical steps are accurate and up-to-date for the course email. Personalize the email with course-specific details and offer support for installation issues. To maintain the email’s integrity and prevent it from being flagged as spam, avoid overusing hyperlinks and ensure it’s sent from a recognized, reputable email address.
Hadoop Training Demo Day 1 Video:
youtube
You can find more information about Hadoop Training in this Hadoop Docs Link
Conclusion:
Unogeeks is the №1 IT Training Institute for Hadoop Training. Anyone Disagree? Please drop in a comment
You can check out our other latest blogs on Hadoop Training here — Hadoop Blogs
Please check out our Best In Class Hadoop Training Details here — Hadoop Training
S.W.ORG
— — — — — — — — — — — -
For Training inquiries:
Call/Whatsapp: +91 73960 33555
Mail us at: [email protected]
Our Website ➜ https://unogeeks.com
Follow us:
Instagram: https://www.instagram.com/unogeeks
Facebook: https://www.facebook.com/UnogeeksSoftwareTrainingInstitute
Twitter: https://twitter.com/unogeeks
#unogeeks #training #ittraining #unogeekstraining
0 notes
Text
Fast and Secure VPS

Select KVM VPS Plan SLICE 2 $18/month 2 GB Guaranteed RAM 50 GB Disk Storage 2 TB Bandwidth vCPU 1 Core IPv4 1 Virtualization KVM SLICE 4 Popular $36/month 4 GB Guaranteed RAM 100 GB Disk Storage 4 TB Bandwidth vCPU 2 Core IPv4 1 Virtualization KVM SLICE 8 $72/month 8 GB Guaranteed RAM 200 GB Disk Storage 8 TB Bandwidth vCPU 3 Core IPv4 1 Virtualization KVM SLICE 16 $144/month 16 GB Guaranteed RAM 40 GB Disk Storage 16 TB Bandwidth vCPU 6 Core IPv4 1 Virtualization KVM Select OpenVZ VPS Plan SLICE 2 $12/month 2 GB Guaranteed RAM 50 GB Disk Storage 2 TB Bandwidth vCPU 1 Core IPv4 1 Virtualization OpenVZ SLICE 4 Popular $24/month 4 GB Guaranteed RAM 100 GB Disk Storage 4 TB Bandwidth vCPU 2 Core IPv4 1 Virtualization OpenVZ SLICE 8 $48/month 8 GB Guaranteed RAM 200 GB Disk Storage 8 TB Bandwidth vCPU 3 Core IPv4 1 Virtualization OpenVZ (register a edu domain) SLICE 16 $144/month 16 GB Guaranteed RAM 400 GB Disk Storage 16 TB Bandwidth vCPU 6 Core IPv4 1 Virtualization OpenVZ VPS Features Multiple OS Support High Performance Storage Fast SSD Storage Instant Deploy OpenVZ or KVM Monthly Pricing Additional IPS rDNS supported Gigabit Network Control Panel Access Fair Share vCore allocations Enterprise grade hardware
What is the difference between KVM & OpenVZ? Ans. KVM VPS is a true virtualisation where it has it’s own kernel, independent from the host node. While OpenVZ VPS has no independent kernel and relies on the host for respond for system calls. OpenVZ has it’s own benefit and KVM has his own. If your application needs true dedicated resources and specific kernel module, you have no other option than KVM to go. But if you think your business would grow overtime and you need upgrade fast ASAP or any modification on your VPS as fast as possible, then OpenVZ is your choice. OpenVZ provides more flexibility of use. Though different benchmarks has proved KVM outperform in performance with OpenVZ. OpenVZ containers are usually cheaper.
What OS options are available? Ans. We provide OS templates of Debian, Centos, Ubuntu, Archlinux, Cern Linux, Funtoo, gentoo linux, Openwall, Altlinux, Suse, Scientific, Fedora, Open Suse, Slackware.
Do you have any high spec (CPU/RAM) OpenVZ plan? Ans. We try to provide as many flexible plans as possible. To view a complete list of plans and comparison, please check going this link: OpenVZ plans
Does the plan include any Hosting Control Panel License like cPanel/WHM? Ans. No. A Virtual Server Instance would need to have it’s own cPanel License or any other hosting control panel if you would like to use. cPanel license for VPS/VSI would cost 15$ a month if you would like to purchase through us. We deal our all licenses.
Can I upgrade my plan later? Ans. Yes, you can. You can do the package upgrade from your Clientarea. This will pro-rated bill you for the upgrades till your anniversary date.
What control panel comes with VPS? Ans. We used Virtualizor VPS Control Panel. Virtualizor is a stable platform and runs by the people who made Softaculous.
Can I order more IPs? Ans. No. Yes, you can. But you have to provide proper justification on your IP usage.
How is bandwidth billed? Ans. Bandwidth allocation showed in our price comparison page or the order page is per month basis. Quota resets on the first day of the month. If you reach your bandwidth limit before the last day of the month, your VPS will be suspended. You can order additional bandwidth or upgrade your package from your Clientarea.
What payment methods are accepted? Ans. We accept More than 10 Payment Method We Support for local and international customer's. See our all Payment Method.
0 notes
Text
Where IoT Can Improve Beer Production Processes

In the beer production process there are manufacturing malt, crushing raw materials, saccharification, fermentation, storage and maturation, filtration, filling and packaging and other processes. Need to use the wind separator, sieving machine, saccharification pot, fermentation equipment, filtration machine, filling machine, packaging machine and other food machinery and equipment. The automation and intelligence of these food machinery and equipment together promote the automated production of beer.
How to use the Internet of Things (IoT) to realize the digitalization, intelligence and visualization of the production and management process in beer factories?
Solution
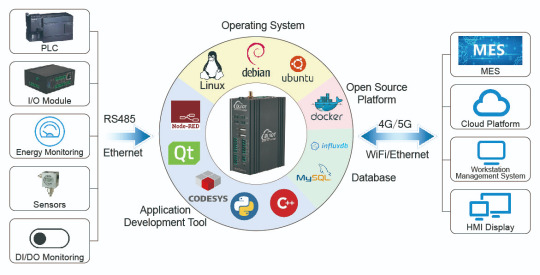
Use BLIIoT EdgeCOM to monitor each production process on the production line; and connect PLC to the EdgeCOM, so that you can not only check the data on HMI, at the same time, the data can be uploaded to the OPC UA client(MES, DCS, etc.).
PLC receives and processes sensor data, controls equipment hydraulic, pneumatic, electrical parameters, etc., while BLIIoT EdgeCOM responsible for controlling the entire production process, to achieve the purpose of information interoperability.
What EdgeCOM implements in the system?
Control commands are sent to the PLC by analyzing the data collected by the PLC.
Write a program through Node-RED or QT to get the data to be displayed from the device, and finally display the data in charts, lists, or other forms on the corresponding interface.
Transfers data to enterprise management systems such as MES.
Advantage of EdgeCOM
Support a variety of communication protocols, reducing communication costs.
EdgeCOM collect the operation status, sensing data, recipe data and alarm information of the equipment, and judge whether it meets the production requirements, according to the analysis results, the EdgeCOM sends control instructions to PLC through OPC UA, then PLC drives the mechanical arm and conveyor belt and other equipment to execute the corresponding actions.
Real-time recording of production line data (e.g., sensor readings, control commands, and product classification), which can be uploaded to My SQL databases, enterprise-level MES, DCS, SCADA, etc., or cloud-based platforms for further analysis.
Support LINUX, Ubuntu, Debian, and other OS, and support Node-Red, QT, Python, C++ and other application programs. Users can program it by themselves according to their needs.
Supports remote configuration and remote upgrade. View More
0 notes
Text
Infrastructure Essentials: Best Practices for Binance Smart Chain Node Setup and Maintenance
As the decentralized finance (DeFi) space continues to gain momentum, the Binance Smart Chain (BSC) has emerged as a prominent blockchain platform offering high throughput and low transaction fees. Whether you are an enthusiast, developer, or investor looking to participate in the BSC ecosystem, setting up and maintaining a Binance Smart Chain node is a crucial step. In this article, we will explore the infrastructure essentials and best practices for a successful Binance Smart Chain node setup and maintenance.
1. Choose the Right Hardware:
The first step in setting up a Binance Smart Chain node is selecting the appropriate hardware. The hardware requirements will vary depending on the type of node you wish to run (e.g., full node, archive node). While running a full node may not demand the highest-end hardware, it's essential to have a modern computer or server with sufficient processing power, memory (RAM), and storage space. Consider future scalability when choosing your hardware to accommodate potential growth in the BSC network.
2. Pick a Reliable Internet Connection:
A stable and reliable internet connection is crucial for running a Binance Smart Chain node effectively. Since the node will constantly communicate with the BSC network, any disruptions in internet connectivity could impact its performance and synchronization with the blockchain. Opt for a high-speed, low-latency internet connection from a reputable provider to minimize potential downtime.
3. Select the Right Operating System:
When setting up your Binance Smart Chain node, choose an operating system that is compatible with the BSC software and suits your familiarity and preferences. Popular choices include Ubuntu, CentOS, and Debian. Ensure that the operating system is regularly updated with the latest security patches to protect against potential vulnerabilities.

4. Install and Configure BSC Software:
After preparing your hardware and operating system, it's time to install and configure the Binance Smart Chain software. The official BSC repository provides comprehensive documentation and instructions for setting up various types of nodes. Follow the step-by-step guidelines carefully to ensure a smooth installation and proper configuration of your BSC node.
5. Enable Firewall and Security Measures:
Security is of utmost importance when running a Binance Smart Chain node. Implement a firewall to control incoming and outgoing network traffic, and only allow necessary ports for the BSC node to communicate with the network. Additionally, configure secure access methods, such as SSH key authentication, to prevent unauthorized access to your node.
6. Set Up Monitoring and Alerts:
To ensure the optimal performance of your Binance Smart Chain node, set up monitoring tools to track its health and key performance metrics. Utilize tools like Prometheus and Grafana to monitor vital statistics such as CPU usage, memory consumption, disk space, and network activity. Additionally, configure alerts that notify you in case of any abnormal behavior or potential issues to address them promptly.
7. Implement Regular Backups:
Data loss can be catastrophic for your BSC node operation. Implement a robust backup strategy to protect your node's data in case of hardware failures or other unforeseen events. Regularly back up your blockchain data and any necessary configuration files to an off-site storage location or cloud service.
8. Stay Up-to-Date with Software Upgrades:
The Binance Smart Chain ecosystem is continuously evolving, with regular software upgrades and improvements being released. Stay informed about the latest updates and security patches from the official BSC repository. Keep your node software up-to-date to ensure compatibility with the network and benefit from the latest enhancements.
9. Join the BSC Community:
Engaging with the Binance Smart Chain community can be highly beneficial for node operators. Join official forums, social media groups, and developer communities to stay informed about best practices, troubleshooting tips, and potential challenges. The BSC community is supportive and can offer valuable insights to enhance your node's performance.
10. Plan for Scalability:
As the Binance Smart Chain ecosystem grows, the demands on your node may increase. Plan for scalability by anticipating potential traffic growth and adjusting your infrastructure accordingly. Consider load balancing, expanding server resources, or even setting up additional nodes to meet growing demands.
Conclusion:
Setting up and maintaining a Binance Smart Chain node requires careful planning, attention to detail, and a commitment to security and performance. By following the best practices outlined in this article, you can ensure a smooth node setup and efficient operation. A well-maintained BSC node not only contributes to the network's integrity and security but also provides you with opportunities to actively participate in the DeFi ecosystem and support the growth of decentralized finance applications and services. As the BSC network continues to evolve, your properly managed node will play an essential role in the success of the Binance Smart Chain and its impact on the broader blockchain landscape.
1 note
·
View note
Text
Nesse passo a passo estarei mostrando um exemplo de como integrar um chat bot GPT-3 que é uma API da OPENAI, que criou o ChatGPT. Integrando Chat GPT com WhatsApp Para fazer esse procedimento estou usando um servidor com Debian (mas já testei o funcionamento com ubuntu 18...). A integração está sendo feita com: node.js venom-bot api da openai OBS IMPORTANTE: Nos testes que realizei, criei um servidor apenas para essa finalidade, se você não tiver conhecimento técnico suficiente para entender o que está sendo feito, sugiro que instale em uma maquina virtual. Neste exemplo, estou utilizando usuário "root" para fazer todo procedimento. Instalando o node.js e atualizando o servidor Vamos começar atualizando o sistema e instalando node.js no servidor: sudo apt-get update -y && apt-get upgrade -y curl -fsSL https://deb.nodesource.com/setup_current.x | sudo -E bash - sudo apt-get update sudo apt install nodejs -y Depois disso, vamos instalar as dependências no servidor: sudo apt-get update sudo apt-get install -y gconf-service libasound2 libatk1.0-0 libatk-bridge2.0-0 libc6 libcairo2 libcups2 libdbus-1-3 libexpat1 libfontconfig1 libgcc1 libgconf-2-4 libgdk-pixbuf2.0-0 libglib2.0-0 libgtk-3-0 libnspr4 libpango-1.0-0 libpangocairo-1.0-0 libstdc++6 libx11-6 libx11-xcb1 libxcb1 libxcomposite1 libxcursor1 libxdamage1 libxext6 libxfixes3 libxi6 libxrandr2 libxrender1 libxss1 libxtst6 ca-certificates fonts-liberation libappindicator1 libnss3 lsb-release xdg-utils wget libgbm-dev Após a instalações dessas bibliotecas, considere reiniciar o servidor. Prosseguindo, agora vamos instalar o venom-bot que será responsavel por conectar o chatbot ao WhatsApp: cd /root mkdir chatbot-whatsapp cd chatbot-whatsapp touch index.js npm i venom-bot No arquivo index, você vai colocar esse código: const venom = require('venom-bot'); venom .create() .then((client) => start(client)); function start(client) client.onMessage((message) => if (message.body === 'Olá' ); Agora teste o funcionamento e veja se o chatbot está funcionando digitando esse comando abaixo no terminal do servidor: node index.js Se estiver tudo certo, será exibido um QRCode para você autorizar o navegador dessa aplicação a usar o seu WhatsApp [caption id="attachment_1011" align="alignnone" width="300"] Exemplo de QRCode do chatbot[/caption] Depois disso, poderá testar digitando um "Olá" ou "Oi" para o WhatsApp conectado ao chatbot. E ele deverá responder pra você "Estou pronto!" [caption id="attachment_1012" align="alignnone" width="300"] Exemplo de resposta do chatbot[/caption] Se até essa etapa está tudo ok, podemos prosseguir. Instalando a API do OPenAI e integrando com WhatsApp Agora vamos para integração com a api do openai, vamos fazer a integração do gpt-3 com o WhatsApp Para isso, vamos instalar a api do openai: cd /root/chatbot-whatsapp npm i openai Deverá criar um arquivo chamado ".env" com suas credenciais de acesso do openai (organização e api de acesso). OBS IMPORTANTE: é necessário se cadastrar no site da openai.com Depois disso poderá adquirir as informações nos seguintes links: OPENAI_API_KEY=https://platform.openai.com/account/api-keys ORGANIZATION_ID=https://platform.openai.com/account/org-settings Já o "PHONE_NUMBER=" é o numero do WhatsApp que você vai colocar no qrcode. touch .env echo "OPENAI_API_KEY=COLEAQUISUAAPI" >> /root/chatbot-whatsapp/.env echo "ORGANIZATION_ID=COLEAQUISUAORGANIZACAO" >> /root/chatbot-whatsapp/.env echo "[email protected]" >> /root/chatbot-whatsapp/.env Agora você pode substituir o código do arquivo index, ou criar um novo arquivo para testar, neste exemplo estou criando um novo arquivo: touch gpt.js E deverá colocar o seguinte código nele: const venom = require('venom-bot'); const dotenv = require('dotenv'); const Configuration, OpenAIApi = requ
ire("openai"); dotenv.config(); venom.create( session: 'bot-whatsapp', multidevice: true ) .then((client) => start(client)) .catch((error) => console.log(error); ); const configuration = new Configuration( organization: process.env.ORGANIZATION_ID, apiKey: process.env.OPENAI_API_KEY, ); const openai = new OpenAIApi(configuration); const getGPT3Response = async (clientText) => const options = model: "text-davinci-003", prompt: clientText, temperature: 1, max_tokens: 4000 try const response = await openai.createCompletion(options) let botResponse = "" response.data.choices.forEach(( text ) => botResponse += text ) return `Chat GPT ??\n\n $botResponse.trim()` catch (e) return `? OpenAI Response Error: $e.response.data.error.message` const commands = (client, message) => const iaCommands = davinci3: "/bot", let firstWord = message.text.substring(0, message.text.indexOf(" ")); switch (firstWord) case iaCommands.davinci3: const question = message.text.substring(message.text.indexOf(" ")); getGPT3Response(question).then((response) => /* * Faremos uma validação no message.from * para caso a gente envie um comando * a response não seja enviada para * nosso próprio número e sim para * a pessoa ou grupo para o qual eu enviei */ client.sendText(message.from === process.env.PHONE_NUMBER ? message.to : message.from, response) ) break; async function start(client) client.onAnyMessage((message) => commands(client, message)); Agora teste o funcionamento e veja se a integração está funcionando digitando esse comando abaixo no terminal do servidor: node gpt.js Se estiver tudo certo, será exibido um QRCode para você autorizar o navegador dessa aplicação a usar o seu WhatsApp Depois disso, poderá testar digitando qualquer frase ou pergunta iniciando por "/bot" Então o bot vai responder você com a inteligência artificial configurada no código do arquivo gpt.js [caption id="attachment_1014" align="alignnone" width="300"] Resposta do chat gpt-3[/caption] Bom é isso, espero que esse passo a passo ajude você. Reiterando que utilizei um servidor somente para essa finalidade, ou seja, para fins de testes. Referencias para publicação desse passo a passo: https://github.com/victorharry/zap-gpt https://platform.openai.com https://github.com/orkestral/venom
0 notes
Text
Unleash Limitless Search: Installing Elasticsearch on the Ubuntu Server
In today's digital landscape, the ability to swiftly retrieve and analyze vast amounts of data is paramount. Whether you're managing a growing business or simply seeking efficient data organization, having a robust search solution is crucial. Enter Elasticsearch – an open-source search and analytics engine that empowers users to explore, analyze, and visualize data in real-time. In this guide, we'll delve into the process of installing Elasticsearch on Ubuntu Server, enabling you to harness its power for limitless search capabilities.
Why Ubuntu Server?
Ubuntu Server stands out as a top choice for hosting Elasticsearch due to its reliability, security features, and ease of use. With a strong community and regular updates, Ubuntu ensures a stable environment for running Elasticsearch, guaranteeing optimal performance and scalability.
Setting Up Elasticsearch on Ubuntu Server
Prepare Your Ubuntu Server: Before diving into the installation process, ensure that your Ubuntu Server is up to date. You can achieve this by running the following commands in the terminal:sqlCopy codesudo apt update sudo apt upgrade
Install Java Development Kit (JDK): Elasticsearch requires Java to operate. Install the appropriate JDK version by executing the following command:arduinoCopy codesudo apt install default-jdk
Download and Install Elasticsearch: Now, let's proceed with downloading and installing Elasticsearch. Follow these steps:
Download the Elasticsearch Debian package using wget:rustCopy codewget -qO - https://artifacts.elastic.co/GPG-KEY-elasticsearch | sudo apt-key add - sudo sh -c 'echo "deb https://artifacts.elastic.co/packages/7.x/apt stable main" > /etc/apt/sources.list.d/elastic-7.x.list' sudo apt update sudo apt install elasticsearch
After installation, start Elasticsearch and enable it to launch on boot:bashCopy codesudo systemctl start elasticsearch sudo systemctl enable elasticsearch
Configure Elasticsearch: Elasticsearch's configuration file is located at /etc/elasticsearch/elasticsearch.yml. You can adjust settings such as cluster name, node name, network host, and more to tailor Elasticsearch to your specific needs.
Verify Installation: To confirm that Elasticsearch is running successfully, use the following command:sqlCopy codecurl -X GET "localhost:9200/"
Harnessing Elasticsearch for Limitless Search
Now that Elasticsearch is up and running on your Ubuntu Server, it's time to leverage its capabilities for seamless and powerful search experiences. Whether you're managing vast datasets, conducting real-time analytics, or implementing advanced search functionalities, Elasticsearch empowers you to do so effortlessly.
Windows RDP and Ubuntu Server: A Seamless Integration
For those operating in a mixed environment or seeking to utilize Ubuntu Server alongside Windows systems, Remote Desktop Protocol (RDP) offers a convenient solution. By configuring Ubuntu Server for RDP access, you can seamlessly access and manage your Elasticsearch deployment from Windows environments, enhancing collaboration and workflow efficiency.
Buy RDP: Streamlining Remote Access

In scenarios where RDP access is not readily available or requires additional resources, purchasing RDP services from reputable providers can offer a cost-effective and hassle-free solution. By opting for a reliable RDP provider, you gain access to secure, high-performance remote desktop environments, ensuring uninterrupted connectivity to your Ubuntu Server and Elasticsearch instance.
Install Ubuntu on RDP: Extending Ubuntu's Reach
Expanding Ubuntu Server's reach to RDP environments opens up a world of possibilities for users seeking flexibility and compatibility across diverse platforms. With the ability to install Ubuntu on RDP instances, you can harness the power of Elasticsearch seamlessly within your existing infrastructure, maximizing productivity and simplifying management tasks.
Conclusion
In conclusion, installing Elasticsearch on the Ubuntu Server lays the foundation for unlocking limitless search capabilities within your infrastructure. By following the outlined steps, you can seamlessly deploy Elasticsearch, empowering your organization with real-time data exploration, analytics, and visualization. Additionally, integrating Ubuntu Server with Windows RDP, leveraging RDP services, and installing Ubuntu on RDP instances further enhances accessibility and compatibility, ensuring a seamless user experience across diverse environments. Embrace the power of Elasticsearch on Ubuntu Server today and revolutionize the way you search, analyze, and extract insights from your data.
0 notes
Text
Rundeck is an open source automation service that lets you easily run automation tasks across a set of nodes. It comes with a web console, command line tools, and a WebAPI. In this guide, I’ll take you through the steps to install and configure Rundeck on Ubuntu 18.04 & Debian 9. The same should also work for Ubuntu 16.04 LTS. Features of Rundeck Distributed command execution Workflow (including option passing, conditionals, error handling, and multiple workflow strategies) Pluggable execution system (SSH and WinRM by default; Powershell available) Pluggable resource model (get details of your infrastructure from external systems) On-demand (Web GUI, API or CLI) or scheduled job execution Secure Key store for passwords and keys Role-based access control policy with support for LDAP/ActiveDirectory/SSO Access control policy editing/management tools History and auditing logs Use any scripting language Step 1: Update your system & Set the hostname Start your installation by making sure your packages are updated. sudo apt update sudo apt upgrade -y After update, set server hostname. sudo hostnamectl set-hostname rundeck.example.com Add the hostname and IP address to /etc/hosts echo "192.168.17.50 rundeck.example.com" | tee -a /etc/hosts Step 2: Install Java 8 ( SE or OpenJDK) Rundeck requires Java 8 installed on the host system. You can install Java 8 on your Ubuntu 18.04 / Debian 9 by: 1. Add Java 8 PPA repository sudo add-apt-repository ppa:webupd8team/java Press [ENTER] when prompted to add the repository to your system. 2. Install Java 8 on Ubuntu 18.04 / Debian 9 sudo apt install oracle-java8-installer Press Ok to Agree to Oracle Binary Code License Agreement for the Java SE Platform Products and JavaFX. Next, Accept Oracle Binary Code license terms by selecting Yes After the installation is done, confirm the Java version installed: $ java -version java version "1.8.0_191" Java(TM) SE Runtime Environment (build 1.8.0_191-b12) Java HotSpot(TM) 64-Bit Server VM (build 25.191-b12, mixed mode) To install OpenJDK 8, just run: sudo apt install openjdk-8-jdk-headless Step 3: Install Rundeck on Ubuntu 18.04 / Debian 9 After installing Java 8, proceed to install Rundeck on Ubuntu 18.04 / Debian 9. Check for the latest release of Rundeck before downloading. wget https://dl.bintray.com/rundeck/rundeck-deb/rundeck_3.0.22.20190512-1.201905130100_all.deb Once downloaded, install the package using dpkg command: $ sudo dpkg -i rundeck*.deb Selecting previously unselected package rundeck. (Reading database ... 105814 files and directories currently installed.) Preparing to unpack rundeck_3.0.22.20190512-1.201905130100_all.deb ... Unpacking rundeck (3.0.22.20190512-1.201905130100) ... Setting up rundeck (3.0.22.20190512-1.201905130100) ... Adding group rundeck....done Adding system user rundeck....done Processing triggers for ureadahead (0.100.0-20) ... Processing triggers for systemd (237-3ubuntu10.3) ... Step 4: Configure Rundeck The main configuration file is /etc/rundeck/framework.properties. Edit the file to customize Rundeck I have modified my Rundeck server connection information to be similar to below: framework.server.name = rundeck.example.com framework.server.hostname = rundeck.example.com framework.server.port = 4440 framework.server.url = http://192.168.17.50:4440 Also set correct hostname on /etc/rundeck/rundeck-config.properties $ sudo vim /etc/rundeck/rundeck-config.properties grails.serverURL=http://192.168.17.50:4440 Don’t forget to replace all occurrences of rundeck.example.com & 192.168.17.50 with your correct values for hostname and IP address. When done with the changes, start rundeckd and set it to start on boot: sudo systemctl start rundeckd sudo systemctl enable rundeckd If you have an active ufw firewall, allow port 4440 sudo ufw allow 4440/tcp To check service status, use: $ sudo systemctl status rundeckd
* rundeckd.service - LSB: rundeck job automation console Loaded: loaded (/etc/init.d/rundeckd; generated) Active: active (running) since Wed 2018-11-14 11:24:45 PST; 19s ago Docs: man:systemd-sysv-generator(8) Main PID: 4751 (java) Tasks: 20 (limit: 2319) CGroup: /system.slice/rundeckd.service `-4751 java -Drundeck.jaaslogin=true -Djava.security.auth.login.config=/etc/rundeck/jaas-loginmodule.conf -Dloginmodule.name=RDpropertyfile Nov 14 11:24:45 rundeck.example.com systemd[1]: Starting LSB: rundeck job automation console... Nov 14 11:24:45 rundeck.example.com rundeckd[4726]: * Starting rundeckd Nov 14 11:24:45 rundeck.example.com rundeckd[4726]: ...done. Nov 14 11:24:45 rundeck.example.com systemd[1]: Started LSB: rundeck job automation console. Step 5: Access Rundeck UI Open http://[IP or hostname]:4440/ on your favorite web browser to Login to Rundeck web console. The default logins are: Username: admin Password: admin Changing admin user password by editing the file /etc/rundeck/realm.properties sudo vim /etc/rundeck/realm.properties Set like below: admin:NEW_ADMIN_PASSWORD,user,admin,architect,deploy,build Restart rundeckd service: sudo systemctl restart rundeckd I hope this tutorial was helpful in your journey to install and configure Rundeck on Ubuntu 18.04 / Debian 9.
0 notes
Text
Open VZ VPS hosting Fast and Secure VPS
Multiple OS Support. High Performance Storage. Fast SSD Storage. 100% Uptime Gurantee.
OPENVZ VPS SLICE 1 $6/mo RAM 1 GB . Disk Storage 25 GB. Bandwidth 1 TB. 1 Core com Select OpenVZ VPS Plan Check our OpenVZ VPS Plans and select the best package for you.
Our Server is 25% Faster With under 60 seconds worldwide deploy!
SLICE 2 $12/month 2 GB Guaranteed RAM 50 GB Disk Storage 2 TB Bandwidth vCPU 1 Core IPv4 1 Virtualization OpenVZ SLICE 4 Popular $24/month 4 GB Guaranteed RAM 100 GB Disk Storage 4 TB Bandwidth vCPU 2 Core IPv4 1 Virtualization OpenVZ SLICE 8 $48/month 8 GB Guaranteed RAM 200 GB Disk Storage 8 TB Bandwidth vCPU 3 Core IPv4 1 Virtualization OpenVZ SLICE 16 $144/month 16 GB Guaranteed RAM 400 GB Disk Storage 16 TB Bandwidth vCPU 6 Core IPv4 1 Virtualization OpenVZ VPS Features Multiple OS Support High Performance Storage Fast SSD Storage Instant Deploy OpenVZ (register a edu domain) Monthly Pricing Additional IPS rDNS supported Gigabit Network Control Panel Access Fair Share vCore allocations Enterprise grade hardware
Frequently Asked Question:
What is the difference between KVM & OpenVZ? Ans. KVM VPS is a true virtualisation where it has it’s own kernel, independent from the host node. While OpenVZ VPS has no independent kernel and relies on the host for respond for system calls. OpenVZ has it’s own benefit and KVM has his own. If your application needs true dedicated resources and specific kernel module, you have no other option than KVM to go. But if you think your business would grow overtime and you need upgrade fast ASAP or any modification on your VPS as fast as possible, then OpenVZ is your choice. OpenVZ provides more flexibility of use. Though different benchmarks has proved KVM outperform in performance with OpenVZ. OpenVZ containers are usually cheaper.
What OS options are available? Ans. We provide OS templates of Debian, Centos, Ubuntu, Archlinux, Cern Linux, Funtoo, gentoo linux, Openwall, Altlinux, Suse, Scientific, Fedora, Open Suse, Slackware.
Do you have any high spec (CPU/RAM) OpenVZ plan? Ans. We try to provide as many flexible plans as possible. To view a complete list of plans and comparison, please check going this link: OpenVZ plans
Does the plan include any Hosting Control Panel License like cPanel/WHM? Ans. No. A Virtual Server Instance would need to have it’s own cPanel License or any other hosting control panel if you would like to use. cPanel license for VPS/VSI would cost 15$ a month if you would like to purchase through us. We deal our all licenses.
Can I upgrade my plan later? Ans. Yes, you can. You can do the package upgrade from your Clientarea. This will pro-rated bill you for the upgrades till your anniversary date.
What control panel comes with VPS? Ans. We used Virtualizor VPS Control Panel. Virtualizor is a stable platform and runs by the people who made Softaculous.
Can I order more IPs? Ans. No. Yes, you can. But you have to provide proper justification on your IP usage.
How is bandwidth billed? Ans. Bandwidth allocation showed in our price comparison page or the order page is per month basis. Quota resets on the first day of the month. If you reach your bandwidth limit before the last day of the month, your VPS will be suspended. You can order additional bandwidth or upgrade your package from your Clientarea.
What payment methods are accepted? Ans. We accept More than 10 Payment Method We Support for local and international customer's. See our all Payment Method.
0 notes
Text
Ubuntu install freeplane 1.6

Ubuntu install freeplane 1.6 how to#
Ubuntu install freeplane 1.6 install#
Ubuntu install freeplane 1.6 update#
Unzip the tarball and configure the build: # tar -xzvf mesos-1.6.0.tar.gz The first thing we have to do is download the source for Apache Mesos 1.6.0: # wget
Ubuntu install freeplane 1.6 install#
Hopefully, the experts will show me what I am doing wrong and make this install a lot quicker. I don't know if you can compile on one server and install on the remaining servers so I asked a question on StackOverflow. We will compile Mesos on each and every node in the cluster. I found that this works best if you run this section on one server at a time. Your systems are now set up to compile everything successfully. # /var/lib/dpkg/info/ca-certificates-java.postinst configure I beat my head on the wall for two hours trying to find the fix until I came across this awesome StackOverflow answer that fixes the issue. I discovered that there is a bug with Ubuntu 18.04 and Java that causes an issue with Maven during the compile and shows an error similar to this: : the trustAnchors parameter must be non-empty # apt -y install build-essential python-dev libcurl4-nss-dev libsasl2-dev libsasl2-modules maven libapr1-dev libsvn-dev zlib1g-dev # export JAVA_HOME=/usr/lib/jvm/java-8-openjdk-amd64/ Reboot your system and we can begin installing the dependencies.
Ubuntu install freeplane 1.6 update#
You will need to run the commands in this section on all your virtual machines including the Mesos Slaves.Īs with most of my how-tos, we need to first update and upgrade a fresh install of Ubuntu 18.04. Enough of the boring stuff, time to get started configuring Mesos on Ubuntu 18.04! Install Mesos on Ubuntu 18.04 You will of course have to change the domain to match yours or if you don't have a domain exclude that second entry on each line. If you don't have local DNS servers then simply update your /etc/hosts file to look like this on each server: 192.168.1.30 mesos1ġ92.168.1.33 mslave1ġ92.168.1.34 mslave2 Mesos Slave 2 - 192.168.1.34Īll systems have a static IP address and I set up my local DNS servers with the hostnames so that NS lookups on the systems would point to the correct IP. Here are the systems including hostnames and IP configurations. I knew I needed a little horsepower to run my little lab so these guys are pretty strong (for my lab environment that is). The last two virtual machines are the Mesos Slaves and I made them pretty stout at 8 vCPUs and 8 GB of memory each. I made them this big so that when I compiled Mesos it would not take all night. Three of them are going to be Mesos Masters and have 4 vCPUs and 4 GB of memory. You can find out more from this free ebook from the folks at Mesosphere which inspired this series of posts. But, to sum up, it is a Fast Data Architecture that utilizes Spark, Mesos, Akka, Cassandra, and Kafka to implement one form of Big Data. I will go more in-depth on what a SMACK stack is in a later post. I will make this one a little beefier because I want to use it as a training platform for the Fast Data Architecture using a SMACK stack. This cluster will be similar to other Mesos/Marathon clusters I have created. We will overcome each one and get Mesos 1.6.0 installed. I have installed Mesos on other versions of Ubuntu but had some difficulties getting everything working on Ubuntu 18.04. This article is part of my new series on Fast Data Architecture.
Ubuntu install freeplane 1.6 how to#
In this post, I will show you how to install Mesos on Ubuntu 18.04.
0 notes
Text
Polkadot node deployment: The ultimate guide
Polkadot is a new blockchain platform that has been designed to solve many of the issues that have come with other blockchains. It is built on the idea of " Platfora ", which is Polkadot's decentralized network that allows for seamless interactions between nodes. This means that it can handle high loads and be more resilient than other platforms.
Polkadot is a new blockchain platform that seeks to improve on aspects of other blockchains, such as scalability and privacy. In this article, we will explore how to deploy Polkadot nodes and identify some potential benefits.
Polkadot is a new blockchain technology that aims to improve scalability and decentralization. It’s designed to create a network of interconnected nodes that can process transactions faster and more securely than traditional blockchain networks. This ultimate guide will show you how to do Polkadot node deployment on your own server, so you can start using the platform right away.
Polkadot is a new blockchain network protocol that aims to achieve scalability, privacy, and decentralization. This guide will teach you how to do Polkadot node deployment on a Linux machine.
Polkadot is a new structural blockchain platform that aims to provide a scalable, interoperable and efficient platform for decentralized applications. It uses a novel consensus algorithm called "dots", which allows for quick and easy network upgrades.
Polkadot is a new blockchain technology platform that seeks to solve many of the issues that have plagued other distributed ledger technology (DLT) platforms such as Ethereum. Polkadot has been designed with scalability, security, and interoperability in mind and its modular architecture allows for rapid deployment of dApps. This guide will walk you through the steps necessary to deploy a Polkadot node on a Ubuntu 16.04 server.
Polkadot nodes are the core of a Polkadot network. Polkadot node deployment is important for two reasons: it allows you to access the Polkadot network and it helps keep the network healthy. In this article, we'll walk you through the steps necessary to deploy a Polkadot node.
Polkadot is a new distributed ledger technology that aims to solve the scalability issues of current blockchain networks. This article will provide a step-by-step guide on how to deploy Polkadot nodes using the official docker image. In this article, we'll walk you through the steps necessary to deploy a Polkadot node on a Ubuntu 16.04 server.
How to Install Docker on Ubuntu 18.04 This is a quick tutorial that shows how to install Docker on Ubuntu 18. 04. This guide will install Docker Engine 18.03 and Docker Machine 1.16. The installation procedure is simple and straightforward, but if you have any questions or comments, please leave them in the comment section below this article! There are a lot of different options to run Docker on Ubuntu 18.
Polkadot is a new blockchain platform that aims to provide a higher level of scalability and faster transactions. This article will provide an overview of how to deploy a Polkadot node, as well as tips for maximizing the performance of your node.
1 note
·
View note
Text
Minikube (Single Cluster of Kubernetes)
Minikube
Minikube is an open source tool that was developed to enable developers and system administrators to run a single cluster of Kubernetes on their local machine.
Step 1: Update system:
sudo apt-get update
sudo apt-get install apt-transport-https
sudo apt-get upgrade
Step 2: Install Docker
sudo curl -fsSL https://download.docker.com/linux/ubuntu/gpg | sudo apt-key add –
sudo add-apt-repository "deb [arch=amd64] https://download.docker.com/linux/ubuntu $(lsb_release -cs) stable
apt-cache policy docker-ce
sudo apt-get install -y docker-ce
sudo systemctl status docker
docker run -d -p 5000:5000 --restart=always --name registry registry:2 #for local image
Step 3: Install Minikube:
sudo wget https://storage.googleapis.com/minikube/releases/latest/minikube-linux-amd64
sudo chmod +x minikube-linux-amd64
sudo mv minikube-linux-amd64 /usr/local/bin/Minikube
minikube version
Step 4: Install Kubectl:
curl -LO https://storage.googleapis.com/kubernetes-release/release/`curl -s https://storage.googleapis.com/kubernetes-release/release/stable.txt`/bin/linux/amd64/kubectl
sudo chmod +x ./kubectl
sudo mv ./kubectl /usr/local/bin/kubectl
kubectl version -o json
Step 5: Start Minikube:
echo ‘export CHANGE_MINIKUBE_NONE_USER=true’ >> ~/.bashrc
minikube start
eval $(minikube docker-env)
Step 6: Check Status Minikube and Kubectl:
minikube service list
minikube docker-env
kubectl cluster-info
kubectl config view
kubectl get nodes
Step 7: Deploy Pod:
kubectl create deployment test-nginx --image=nginx
Kubectl get pods
kubectl exec pod_name env
kubectl exec -it pod_name bash
kubectl scale deployment test-nginx --replicas=3
kubectl expose deployment test-nginx --type="NodePort" --port 80
kubectl get services test-nginx
minikube service test-nginx –url
https://techiio.com/blog/rakeshrestha/minikube-single-cluster-of-kubernetes
0 notes